Multirotor Setup Guide
[!NOTE] This page provides a general guide for things specific to Multicopter setup and tuning.
It assumes you have already setup yourPorts,Modes,Navigation,Receiver,GPS,OSDetc. They are outside the scope of this document.
1. Getting your flight controller ready.
-
Download latest configurator from here.
-
Flash newest INAV with the full chip erase option selected.
-
When asked, select your model preset type. If the type of model you have is not under the presets. Go to the
Mixer Taband select one of theMixer presetsin the drop-down menu. Many of the more common mixers are available here. (Tri, Hex, Octo etc) Press Load and Apply to make your choice. For less common mixer types, see Custom mixes for exotic setups. Other Mixer related information can also be found here and here. -
Go to the
Calibration Taband follow the instructions given to perform anAccelerometer Calibration. Run the advanced 6-point sensor calibration. -
If you use a magnetometer (recommended), it will also require setup in the
Alignment Tool TabandCalibration Tab. More specific information with regards to Flight Controller / Magnetometer alignment and calibration can be under GPS and Compass setup. You may need to attach a battery for magnetometer calibration if your GNSS/mag module is not powered by the FCs 4.5v USB pins. -
Once the above is complete. Make sure the Copter moves identical to the virtual image in the
Status Tab. It must do this on all 3 axis's. A deviation indicates incorrect alignment or calibration. -
Now go to the
Outputs Tab, and Enable Motor and Servo output. -
While in the
Outputs Tab, select the ESC protocol of your choice. -
If the motor output plug on your flight controller does not align with the canonical Betaflight motor placement of a 4 in 1 ESC. e.g. S1 to Right fore and S2 to Right aft etc. - they may be something like S1 to S4 and S4 to S1, the motor placement can be remapped. The
Motor Mixer Wizardin theMixer Tabcan be used to allocate a motor output from the flight Controller, to the corresponding position each motor is located according to which of the 4 ESC's it is wired to. -
Select motor direction if required. Depending on whether you want to run
Props INorProps OUT.
2. Setup failsafe and a couple of important navigation settings
Adjusting these setting won't take long, but they are often overlooked in setup consquently leading to poor navigation performance or a crash landing in a Failsafe condition.
-
nav_mc_hover_thr- Please read here for a more detailed explanation of why it is important to adjust this setting. -
failsafe_throttleandfailsafe_of_delay- Please read through this short explanation here to help understand why adjusting these settings is required.
More advanced MC operation and tuning information can be found under Navigation modes and Navigation PID tuning (MC).
3. Tune your copter's Pitch/Roll/Yaw/Level PIDs and other values
INAV multicopter tuning can be made easier for new users with EZ-Tune. When you load a platform preset after flashing your hardware, multicopter EZ-Tune will be enabled by default in the Tuning Tab. If you wish to run your own tun, turn it off using the EZ-Tune ENABLED button.
The default presets many not always be correct due to the influence your selected hardware can have upon the PID tune such as frame type, motors, props, battery etc.
Example: A lower powered 5" cruiser running on a 3 cell battery, will generally require a different tune from a 5" race quad running on a 6 cell battery. The reason being is because the 6s quad will provide far more impulse thrust per weight for the PID controller to work with. Actually making tuning easier. But often requires some of the gains to be lower from the default, because the PID setpoint error can be dealt with much faster.
The image below shows an example of the preset tune for a 7" multicopter.
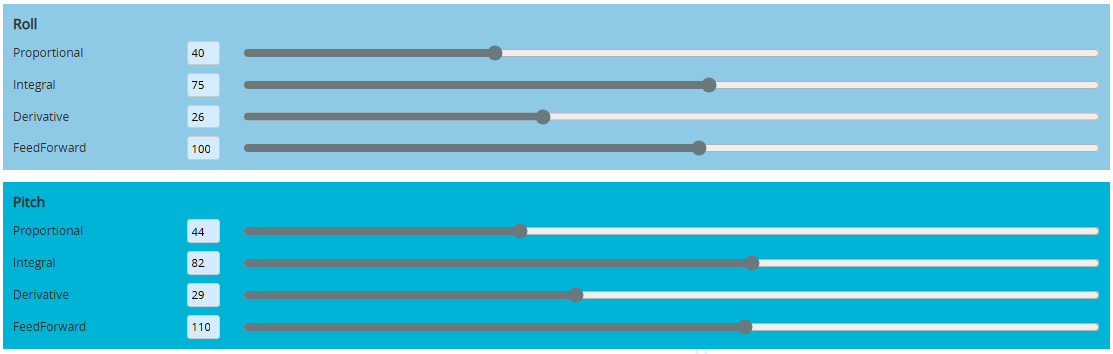
But in the case mentioned above under the TIP. Such a tune is better suited to a multicopter that is NOT running a stronger power train.
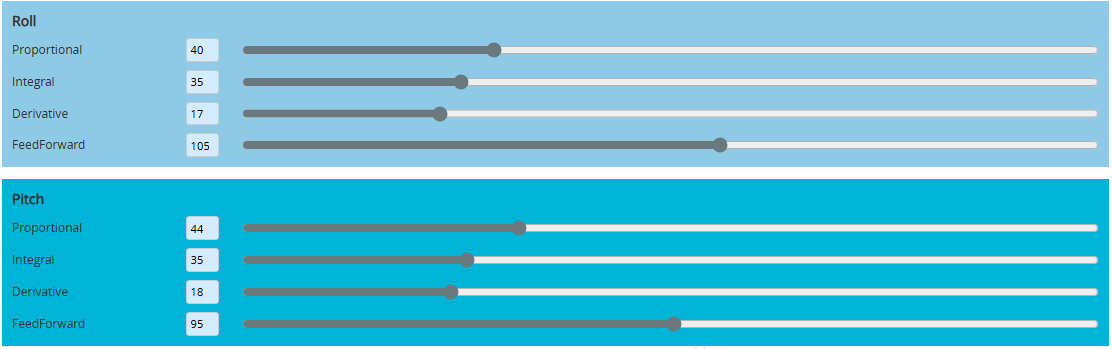
The tune below has the Integral and Derivative gains on the pitch and roll reduced, to better suit a multicopter that has a higher power to weight ratio. If you have migrated from BetaFlight to INAV. These gains will provide a safer starting point to begin tuning from. Whether it be a 3", 5" or 7" build.
4. Battery settings
Add your batteries specifications into the CLI, under # battery_profile or in the Configurator's Configuration Tab.
This is a very important step.
Overlooking this step can cause your battery to become over discharged during the flight, leading to a crash.
vbat_warning_cell_voltage- Pre-warning. Set to 3.6v is good for a LiPo.vbat_min_cell_voltage- Time to land. Set to 3.4v is good for a LiPo.battery_capacity- Set to the ratedmAhcapacity of your battery pack.battery_capacity_warning- Generally set to 25%. Which is 25% of the batteries rated capacity.battery_capacity_critical- Set to 20%.
Continually discharging lithium chemistry batteries below 20% of their rated capacity under higher loads can reduce its capacity and also shorten the batteries life expectancy.
More in-depth battery setup information can be found here.
5. Selecting filters
INAV has the following software filter methods. They are used to isolate and remove vibration induced noise from the Gyro and Accelerometer data.
Gyro Filters
gyro_filter_mode- STATIC, DYNAMIC, ADAPTIVEdynamic_gyro_notch_enabled(default ON - aka Matrix filter)rpm_gyro_filter_enabled(default OFF - ESC telemetry, non bi-directional Dshot)gyro_anti_aliasing_lpf_hz(default ON - zero = OFF)gyro_lulu_enabled(default OFF)smith_predictor_delay(zero = default OFF)setpoint_kalman_enabled(default ON - aka Unicon filter)
Accelerometer Filters
acc_lpf_hz(default of 15Hz is a good balance between performance and noise handling)acc_lpf_type(filter type) - BIQUAD, PT1acc_notch_hz(center frequency of the noise peak) - Should only be used if the peak is narrow and known by log dataacc_notch_cutoff(lowest practical frequency the notch should be set). Only set if the above is used
Accelerometer vibrations more often cause issues for navigation control, than Gyro induced vibrations.
Lowering acc_lpf_hz below 7Hz in an attempt to filtering out vibrations, will begin to cause it's own problems, making navigation control loose.
Filter Utilization
Filters add signal delay and can only remove so much noise before they begins to effect flight performance. For this reason it is always better to mechanically setup the hardware first and eliminate as many vibrations as possible eg. by balancing props and ensuring FC is mounted properly. Just because the hardware is new, it does not mean it is well balanced from factory. If a motor isn't balanced correctly, the imbalance can be heard audibly.
It's better to run a few good filters, than to run every filter available, which will only add even more control latency, and often add no extra improvement. The gyro filters are placed in the order of importance found from flight experience.
Mechanical Filter Optimization
Mechnically removing vibrations will have the most effect in reducing noise.
- Use silicon vibration dampeners for your flight controller.
- Do not tighten the stack bolts too tight. This will crush the dampener, reducing their ability to adsorb vibrations. Only tighten them firm enough to stop movement. You may have to use thread lock to prevent the nuts coming loose.
6. Get to know the CLI values.
INAV offers a lot of customization through CLI variables. It is strongly recommended to read through CLI Variable reference and available CLI variables