Flight Modes - Standard
Flight Modes in INAV can be categorized into two groups:
- Navigation-Modes which involve GNSS and other positional sensors. Refer to the Navigation Flight Modes page for more information.
- Non Navigation Modes perform actions that may only rely on the accelerometer and gyro, or no sensor at all. See the mode descriptions below.
Some modes are only available to certain craft types. This is indicated by:
- FW = Fixed Wing
- MC = Multi-Copter
Scroll down to the AUXILIARY CONFIGURATION section for how Modes are assigned to channels on your radio.
Non-Navigation Modes Index
- ACRO MODE (default mode)
- AIR MODE
- ANGLE
- ANGLE HOLD FW
- ARM
- ALTHOLD
- AUTO LEVEL TRIM FW
- AUTOTUNE FW
- BEEPER
- BEEPER MUTE
- BLACKBOX
- CAMERA CONTROL
- CAMSTAB
- FAILSAFE
- FLAPERON FW
- FPV ANGLE MIX MC
- HEADADJ MC
- HEADFREE MC
- HEADING HOLD
- HOME RESET
- HORIZON
- KILLSWITCH
- LEDLOW
- LOITER CHANGE FW
- MANUAL FW
- MC BRAKING MC
- MIXER PROFILE 2
- MIXER TRANSITION
- MSP RC OVERRIDE
- MULTI FUNCTION
- NAV LAUNCH FW
- OSD ALT
- OSD SW
- PREARM
- SERVO AUTOTRIM FW
- SOARING FW
- SURFACE
- TELEMETRY
- TURN ASSIST FW
- TURTLE MC
- USER1 & USER2 & USER3 & USER4 (aka PinIO)
- WAYPOINT PLANNER
ACRO MODE
This is default flight mode. It's only active when no other flight mode is active. There is no mode selection for ACRO in the Configurator, only an ACRO box that highlights when no other mode is active.
This default flight mode does not self level the aircraft around the roll and the pitch axes.
The aircraft does not level on its own if you center the pitch and roll sticks on the radio.
Rather, they work just like the yaw axis: the rate of rotation of each axis is controlled directly by the related stick on the radio and by leaving them centered the flight controller will just try to keep the aircraft in whatever orientation it's in.
This default mode is called "Acro" mode (from "acrobatic", shown in the OSD as ACRO).
It is also sometimes called "rate" mode because the sticks control the rates of rotation of the aircraft around each of the three axes.
"Acro" mode is active whenever an auto-leveled mode is not enabled.
AIR MODE
Air Mode Multicopters
In the motor control mixer, when the Roll, Pitch and Yaw are calculated, if a motor output becomes saturated, all motors will be reduced equally. Or when a motor goes below minimum, its output gets clipped off.
Example: You have the throttle just above minimum and tried to pull a quick roll. Since two motors can't go any lower, you essentially get half the power (half of your PID gain). If your input command calls for more than 100% difference between the high and low motors, the low motors will get clipped, breaking the symmetry of the motor balance by unevenly reducing the gain.
This is when MC Airmode will allow full PID correction during zero throttle maneuvers, providing for inverted hang-time aerobatics.
It will also make cornering and turns much tighter since full stabilization correction is active.
You can set Airmode to be always active via feature PERMANENTLY_ENABLE_AIRMODE or ONLY by enabling it together with ACRO mode in the modes tab.
Airmode will keep I-term fully enabled at zero throttle, once airmode_throttle_threshold is exceeded the first time, until you disarmed.
This adds protection on the ground when the throttle is below min_check to prevent I-term windup before takeoff, which could flip-over more powerful models.
Motorstop_on_low](https://github.com/iNavFlight/inav/blob/master/docs/Settings.md#motorstop_on_low) is not normally recommended for aerobatic quads, when Airmode is active. However, it can have some advantages for larger multicopters and even quads that have a very high thrust to weight ratio. In both these cases it is beneficial to ONLY have Airmode enabled in the modes tab together with ACRO mode and NOT permanently enabled with all flight modes. The reasons being are:
- It is better to land larger copters in ANGLE mode for added level stability, so you don't require Airmode to be active keeping the motors idling, which can potentially lead to I-term windup instability once on the ground.
It is generally safer for the multicopter to have
motorstop_on_low, shutoff the motors as soon as you lower the throttle at touchdown. However this would not occur in ANGLE mode iffeature PERMANENTLY_ENABLE_AIRMODEwas active becauseairmode_throttle_thresholdwould overridemotorstop_on_lowin all flight modes in this case. - The second reason to use the above method, is for lightweight 6 cell race quads. These copters generally produce so much thrust, that the model will hover at less than 10% throttle. This can lead to I-term windup immediately after a less than smooth touchdown, often causing the copter to instantly flip-over.
CAUTION: ALWAYS manually Disarm after touchdown, or watch for the landing detector to automatically disarm within a few seconds.
Additional benefits: MC Airmode I-term functionality can be adjust in the Configurator Tuning tab, under I-term Mechanics. With features like I-term relax and Anti-gravity.
Air Mode Fixedwing
Fixedwing Airmode works differently. When used in conjunction with ACRO mode, Airmode superimposes an Attitude hold type stabilizer over the Rate mode stabilizer. Because permanently enabled Airmode is often selected, most people overlook the difference between Rate and Attitude modes.
When ACRO or RATE mode is active by itself and you move the airplane on an axis, you will see the control surface on that corresponding axis quickly deflect to apply correction against that motion, then return the control surface to the center position again.
However, if Airmode is enabled with ACRO mode and you have Airmode activated via Airmode_throttle_threshold and run the same test as above by moving the airplane on an axis, you will observe the control surfaces begin to deflect and hold that deflection until the airplane is brought back to the attitude it started from.
The strength Airmode will apply to holding a specific flight attitude is determined by how much I-term applied to that axis.
There is little to no benefit to having Airmode enabled with other flight modes that are ANGLE based because they use the LEVEL controller.
For Fixedwing Airmode to become active for flight, it requires airmode_throttle_threshold to be met, which uses different settings for airmode_type than for multicopter.
They are - STICK_CENTER and STICK_CENTER_ONCE.
STICK_CENTER_ONCE is activated by the same method - using airmode_throttle_threshold, but instead of disabling Airmode when the throttle is lowered below the throttle_threshold, it will keep Airmode active until disarmed.
This is more beneficial for fixedwing platforms like powered gliders so they maintain Airmode stabilization at zero throttle.
The requirement to also move the sticks from center to activate Airmode prevents I-term windup before launch if you don't throw the airplane immediately after raising the throttle.
An Attitude stabilizer which uses a passive means to implement control, like control surfaces, opposed to an active means like motors can only hold the attitude it is commanded if it is provided enough airflow over the control surface to do the work.
Please see PIDFF Controller for Fixed Wings for additional information on this topic related to Fixedwings.
ANGLE
In this auto-leveled mode, the roll and pitch channels control the angle between the relevant axis and the vertical, which achieves leveled flight by leaving the sticks centered.
Maximum banking angle is limited by max_angle_inclination_rll and max_angle_inclination_pit
ANGLE HOLD (FW)
This mode works as an attitude hold stabilizer, but is not designed for 3D aerobatic use. It behaves more like Acro mode, in the way the desired flight attitude is achieved by stick deflection but releasing the stick centers the aircraft as it would in Angle mode. The main difference is, ANGLE HOLD will attempt to offset the earth-frame reference of the Level controller on the pitch or roll to the angle commanded by your stick deflection to hold that specific flight attitude. Returning the airplane to level flight is done the same as when flying in Acro or Manual modes.
This flight mode has angle constraints set by the navigation angle limits - nav_fw_climb_angle, nav_fw_dive_angle and nav_fw_bank_angle.
Usage
It was designed so it can also be used with - COURSE HOLD or ALT HOLD. Although both can not be selected for use with ANGLE HOLD at the same time.
- ANGLE HOLD + COURSE HOLD - Will maintain a constant heading and climb angle over a long distance. e.g. Up or Down the side of a long mountain range.
- ANGLE HOLD + ALT HOLD - Will allow the airplane to make a long banking turn, without losing altitude in the turn.
Use caution! - If the pilot requests the airplane to hold a high climb angle, the pilot MUST provide adequate throttle (motor thrust) to maintain airspeed or the airplane will stall.
ARM
Arm activates numerous conditions required for fligh and allows the motor/s to become active for propulsion. Some of these conditions are:
- Starts flight logging. Including Blackbox and flight stats
- Records the RTH location and altitude
- Can load WP mission from eeprom to FC memory
- Can enable FW auto launch
- Starts the flight timer
When DISARMING occurs, it disables some of the above functions and saves certain in-flight changes when applicable.
ALTHOLD
Classification: flight mode modifier
This mode is a flight mode modifier that maintains the altitude of the aircraft the moment you activated with a non-navigation mode such as ANGLE.
All navigation modes already have ALTHOLD enabled by default. For more information see here.
AUTO LEVEL TRIM (FW)
Classification: Tuning mode
AUTO LEVEL TRIM will attempt to automatically tune the pitch offset (fw_level_pitch_trim).
A fixed-wing airplane needs to not lose altitude when flying straight in a self levelling flight mode.
While in cruise, airplanes naturally have a slight pitch up to maintain level flight.
Usage
To use AUTO LEVEL you should first be in a self levelling flight mode which does not use ALTHOLD. ANGLE, HORIZON, and COURSE HOLD are all fine. Once in that mode, enable AUTO LEVEL and do not make corrections. AUTO LEVEL will attempt to tune the correct Angle of Attack for your current speed. You can see how level the craft is flying with the numerical variometer element on the OSD. +/- 0.3° is an acceptable tolerance. Once flying level, you can disable AUTO LEVEL. From INAV 6.0, a system message is shown when AUTO LEVEL is active. The trimming speed and accuracy can also be adjusted via fw_level_pitch_gain.
If new value isn't saved to EEPROM automatically on disarm, you have to save it manually using either the configurator or a stick combo.
However, if you have a feature enabled which saves on disarm, such as Continuous Servo Trim or Stats. The new fw_level_pitch_trim will be saved on disarm.
Pre INAV 7.0, this tuning mode was called AUTO LEVEL
AUTOTUNE (FW)
AUTOTUNE will only attempt to tune the Roll and Pitch FeedForward and Rates on a fixed-wing airplane.
Autotune will monitor the behavior of the airplane and attempt to tune the FeedForward gains for the maximum rate of rotation on each axis. This will provide optimal stabilization and navigation performance for your aircraft.
Autotune should ideally be performed at the approximate airspeed the airplane will cruise at.
This isn't always an easy thing to accomplish, especially when performing pitch climb maneuvers. Getting this correct can make a considerable difference to overall flight performance.
Full stick deflection MUST be applied for a reasonable duration in the tuning process. Otherwise the controller will not be tuned to provide the maximum axis rotation rate.
Usage
Enable AUTOTUNE mode in any non-navigation flight mode. ACRO is the best option and should be chosen over Angle or Horizon modes.
The Advanced ROLL/PITCH method MUST be performed in ACRO mode!
The more maneuvers you do via the Standard method, the better results AUTOTUNE will provide, up to a point. While the Advanced method will provide a more sustained snap shot of you airplanes maximum axis rotation rate. Meaning it will complete the tuning process faster and generally provide a more accurate tune.
Make sure you provide yourself enough altitude and flight area to perform the following tasks.
-
Standard ROLL - From level, bank hard left, then hard right as far as you feel confident, then repeat several times. Initially you may notice a soft/slow response if the Rates and Feedforward where far from correct.
-
Standard PITCH - When flying level, quickly pull UP full stick for a moment, so the airplane climbs rapidly to an angle you're comfortable with, and then bring the airplane back to level flight, to regain its airspeed. Then do the same for DOWN, pushing full pitch stick for a moment so the plane dives at an angle you're comfortable with, and then bring the airplane back to level flight; repeating the process again several times. Initially you may notice a soft/slow response if the Rates and Feedforward where far from correct.
-
Advanced ROLL - IF you and your airplane are capable of completing a full 360° roll at full stick deflection, both left and right. This should complete the autotune process in only one or two attempts.
-
Advanced PITCH - IF you and your airplane are capable of completing a full 360° forward and/or inverted loop. Not recommended on larger aircraft, or those that have a lower thrust to weight ratio. Increase the throttle just before you apply enough UP elevator stick to start the loop. Once at the top of the loop, start applying full elevator stick. Then as you are about to exit the bottom half of the loop, start backing off the elevator a little and the throttle. For an inverted loop. Gain some good altitude, and push full DOWN elevator. Remember to start applying full throttle at the bottom half of the inverted loop, as you simultaneously back off the DOWN elevator stick enough to prevent a stall when the plane is commencing the vertical climb-out half of the loop. This should complete the autotune process in only one or two attempts.
AUTOTUNE will adjust the gains continuously throughout the flight, but it will take a snapshot of current gains every 5 seconds. When you disable it, the AUTOTUNE gains from last snapshot will be restored. If you turn AUTOTUNE on and off before the 5 seconds elapse; the FF gains and Rates won't be changed.
Currently AUTOTUNE doesn't save gains to the EEPROM - you have to save it manually using a stick combo or by using it in combination with continuous trim servos or the Odometer Stats, which automatically saves settings to the eeprom at disarming.
For detailed description go to PIDFF Controller for fixed wings
BEEPER
When activated, it makes the beeper connected to the FC beep. A typical use case for this would be to locate a lost model in a field. For more information, please see Buzzer page
BEEPER MUTE
Allows the flight controller beeper to be muted by a switch to provide some peace and quiet during setup.
BLACKBOX
If you're recording to an onboard flash chip, you probably want to disable Blackbox recording when not required in order to save storage space. To do this, you can add a Blackbox flight mode to one of your AUX channels on the Configurator's modes tab. Once you've added a mode, Blackbox will only log flight data when the mode is active.
A log header will always be recorded at arming time, even if logging is paused. You can freely pause and resume logging while in flight.
See BLACKBOX for more information.
CAMERA CONTROL
Camera control 1, 2 & 3 are used to adjust settings from your RC transmitter, when Analog/HD record camera's like the Runcam Hybrid or Split are used. Available function controls are:
- WiFi - App connection
- Power - Start/Stop record
- Mode change - Alter analog and HD record image settings.
CAMSTAB
Allows Tilt or Roll servo's to be used as an actively stabilized gimbal. The dedicated axis for each servo is selected in the Mixer tab.
FAILSAFE
Lets you activate flight controller failsafe with an aux channel.
This mode is primarily designed to manually test if failsafe will work when required. Do not use it as a RTH mode!!
Read Failsafe Tab for more info.
FLAPERON (FW)
Activating it moves both ailerons down (or up) by predefined offset.
Configuration besides activating FLAPERON mode is pretty simple and consists of just one CLI variable:
flaperon_throw_offsetdefines throw range in us for both ailerons that will be applied when FLAPERON mode is activated. By default it 250 with max at 400.
Flaperon offset is by default is applied as a servo mixer input with ID=14 so using custom servo mixing you can configure FLAPERON mode to deflect any servos you need (including dedicated flaps).
FPV ANGLE MIX (MC)
This mode mixes in Pitch with a commanded ROLL stick input OR mixes in Pitch with a commanded YAW stick input.
To overcome the sweeping or arching effect that is seen via the FPV view, based on the camera's up-tilt angle.
This provides a more visually appealing (true to axis) freestyle or cinematic experience.
Simply set fpv_mix_degrees = X° , to the up-tilt angle your camera is set.
Then enable it together with ACRO mode.
HEADADJ (MC)
It allows you to set a new yaw origin for HEADFREE mode.
HEADFREE (MC)
In this mode, the "head" of the multicopter is always pointing to the same direction as when the feature was activated. This means that when the multicopter rotates around the Z axis (yaw), the controls will always respond according the same "head" direction.
With this mode, it is easier to control the multicopter and even fly it with the physical head towards you since the controls always respond the same. This is a friendly mode to new users of multicopters and can prevent losing the control when you don't know the head direction.
HEADING HOLD
This flight mode affects only yaw axis and can be enabled together with any other flight mode. It helps to maintain current heading without pilots input and can be used with and without magnetometer support. When yaw stick is in neutral position, Heading Hold mode tries to keep heading (azimuth if compass sensor is available) at a defined direction. When the pilot moves the yaw stick, Heading Hold is temporary disabled and waits for a new setpoint.
Heading hold only uses yaw control (rudder), so it won't work on a flying wing which has no rudder, unless it has twin motor yaw stabilization active.
HOME RESET
This mode provides a means to reset the home location or arming coordinates the model will return to. This is beneficial if you choose to launch or takeoff before the model has a GPS fix. By using this mode, you can fly past your launch site later in the flight, once a GPS fix is established and momentarily activate the feature. Ideally, it is better to place this mode on a Pot or multi-position button, so it doesn't get unintentionally activated.
HORIZON
This hybrid mode works exactly like the previous ANGLE mode with centered roll and pitch sticks (thus enabling auto-leveled flight), then gradually behaves more and more like the default ACRO (rate) mode as the sticks are moved away from the center position, which means it has no limitation on banking angle and can do flips.
The biggest complaint against Horizon mode, is the abruptness in which the stock settings transition from Angle to rate.
This can catch newer pilots off guard, but can be made smoother by altering these setting -
max_angle_inclination_rll = 900
max_angle_inclination_pit = 900
fw_d_level = 95 OR mc_d_level = 95.
This will allow for a more linear stick feel, equivalent to Acro and only permit the transition to occur near maximum stick deflection, or around 85° roll or pitch angle from level when you're certain you want to command a roll or flip.
This can be applied to both MC and FW platforms.
KILLSWITCH
Allows the flight controller to be instantly disarmed and locked out, regardless of other settings, saves or checks.
LEDLOW
Turns off the RGB LEDs.
LOITER CHANGE (FW)
Reverses set loiter direction when mode selected.
MANUAL (FW)
Direct servo control in fixed-wing. This mode was called PASSTHROUGH mode up to version 1.8.1.
In this mode there is no stabilization.
Please note that MANUAL mode also overrides nav modes except RTH. To switch to a nav mode such as POSHOLD from MANUAL, MANUAL needs to be turned off first.
What FC does in MANUAL mode is: Motor mixing, Servo Mixing, Expo settings, Throws limiting (see the manual_*_rate settings).
Please note that Failsafe is still active in this mode and can override the controls.
MC BRAKING (MC)
Used with POSHOLD mode, this mode provides faster manual braking when the pitch stick is released.
For this mode to work, it requires nav_user_control_mode = CRUISE to be enabled.
Use with caution. This mode can cause temporary runaway with some settings and under some conditions.
more details
MIXER PROFILE 2
This mode is primarily used to activate Mixer profile 2, which contains multirotor control and PID settings for VTOL models.
MIXER TRANSITION
Used to transition VTOL aircraft from the multirotor control profile to the fixedwing control profile and back again. This is used for allowing a VTOL to increase forward airspeed before entering full fixedwing flight to not stall or lose altitude in the transition process. It can also be used to slow the aircraft in fixedwing flight for braking and better control stability before it enters the multirotor (VTOL) state.
MSP RC OVERRIDE
Allows defined RC channels to be overridden by MSP MSP_SET_RAW_RC messages.
The channels to be overridden are defined by the CLI setting msp_override_channels.
There is a code example that provides further information and a sample application illustrating the use of MSP RC OVERRIDE.
MULTI FUNCTION
This feature uses a single mode to select between multiple functions based on feedback provided by the Multi Function OSD field (found in the OSD Tab).
The general idea is to allow a number of less used modes and functions to all be controlled by a single RC channel. Ideally a momentary switch should be used to operate the mode for greater ease, although it can still work with a normal toggle switch. The OSD side of this feature can be used separately from the Mode side, if you just want to use it as a diagnostic tool on your display.
FUNCTION MODE SIDE
Pre 9.1
- Briefly toggling the mode switch ON/OFF, repeating the sequence until the required function is displayed in the OSD.
- The function is then triggered by activating the mode for > 3s.
- Deactivating the mode for > 4s resets everything, leaving the OSD field blank.
9.1+
- Activating the mode is done by briefly toggling the switch for < 1s. This will begin displaying the available functions. They will continuously cycle through the list, displaying each function for 1.5s.
- To use a function, activate the mode for > 3s when the function you require is being displayed.
A message will show
FUNC SETon the OSD when the function is enabled. - To cancel the functions: When the list is cycling through, activate the mode briefly for < 1s, then release the switch.
Current functions include -
| Function | OSD message | Information |
|---|---|---|
| Re-displaying any warnings | ||
| Emergency landing activation | EMERG LAND and ABORT LAND | |
| Safehome suspend | USE SFHOME and SUS SFHOME | |
| Trackback suspend | USE TKBACK and SUS TKBACK | |
| Turtle mode activation | USE TURTLE and END TURTLE | Must be disarmed and rearmed after activation, as Turtle mode requires |
| Emergency arming function | EMERG ARM | |
| Calibrate mag - INAV 9.1 | CAL COMPAS and SET HEADIN | Also used to set known NORTH heading before takeoff, for MC magless operation |
OSD DISPLAY SIDE
Pre 9.1 The warnings are displayed for 10s when first triggered, after which the warning disappears to be replaced with an alert symbol and a number showing the active warnings total. Active warnings are then re-displayed for 5s on a rolling 30s cycle. The field is blank if there are no warnings.
9.1+ The warnings now display constantly without blinking. With the exception of new warnings, which are displayed individually for 10s with blinking to highlight the fact it's a new warning. After the 10s, all current warnings are displayed on a 1s cycle without blinking.
Current Warnings are provided:
| Warning | OSD message | Information |
|---|---|---|
| Battery state | Voltage - VBATT LAND and VBATT LOW | |
| Battery state | Capacity - BATT EMPTY and BATT DYING | |
| GPS Fix or Failure | GPS FAILED and NO GPS FIX | |
| RTH Sanity | RTH SANITY | >200m heading in wrong direction |
| Altitude Sanity | ALT SANITY | Difference between estimated and GPS altitude > 20m |
| Compass failure | MAG FAILED | |
| Airspeed failure | PITOT FAIL | Failure of sensor or blocked pitot tube hole |
| Ground Test mode | GRD TEST ! |
OSD ALT
Switches to the different alternative OSD displays ALT1, ALT2 or ALT3.
The default OSD layout is shown when none of these are selected.
If the user selects osd_failsafe_switch_layout = ON, the OSD will switch to the default OSD layout if a Failsafe occurs.
For this reason, it can be useful to have the home coordinates on your default OSD layout.
OSD SW
Switches off the OSD.
PREARM
When PREARM is assigned a range, INAV then prevents Arming until the PREARM condition is met and will raise a prearm error if Arming is attempted. After the craft is armed, then INAV stops monitoring the PREARM condition.
SERVO AUTOTRIM (FW)
Classification: Tuning mode
In flight adjustment of servo midpoint for straight flight
Only servos with a "stabilized" rule on the Servo Mixer are trimmed.
Also note that the automatic version of this introduced in 3.0 requires a GPS and detectable motion in order to work.
The purpose of this mode is to set new midpoints for servos 2 to 5. Make sure you assign these servo numbers to your control surfaces or they will not be trimmed. If you have another servo (e.g. a servo gimbal) assigned to to servos 2 to 5, then this servo will be trimmed.
This is so when switching into manual mode the plane will fly straight, its also to help the PIFF controller know where the plane is expected to fly straight.
How to use:
- This is intended to be used while in flight.
- Fly straight, choose what mode that suites you best. (
manual,angleoracro) - Enable
SERVO AUTOTRIMmode, and keep flying straight for 2 seconds. After 2 seconds it will set new midpoints based on average servo position during those 2 seconds. - If you're are NOT happy with new midpoints disable
SERVO AUTOTRIMmode and it will revert back to old settings. If you want to keep new midpoints keepSERVO AUTOTRIMturned on, land aircraft and disarm. New midpoints will be saved.
You may want to inspect your new midpoints after landing, if the servo offset is a lot you may alter your linkage mechanically and redo servo midpoint.
This is not to be confused with tuning your aircraft for leveled flight in ANGLE and other attitude-conteolled modes. to do this use AUTO LEVEL TRIM.
SOARING (FW)
Fixed wing mode for soaring flight with motor off so intended for sailplanes or motor gliders. This mode becomes active only when Position Hold or Cruise/Course Hold modes are also selected providing semi-autonomous soaring whilst circling or flying straight with heading hold.
When mode is active altitude control is disabled and Angle mode allowed to free float (disabled) within the pitch range set by nav_fw_soaring_pitch_deadband (float pitch angle either side of level).
The motor can be stopped by setting nav_fw_soaring_motor_stop.
SURFACE
Multirotor only - Enables terrain following when a rangefinder (LIDAR/SONAR) is installed.
Surface mode modifies altitude-controlled modes (ALTHOLD, POSHOLD, CRUISE) to maintain a constant height above ground instead of absolute altitude. This allows flying over uneven terrain while keeping the same ground clearance.
This will use a LIDAR or SONAR to follow the shape of the ground, as shown by the orange line in this image.
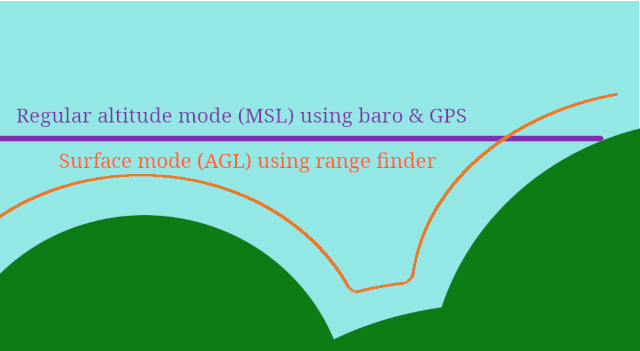
Pilots occasionally ask about combining the rangefinder reading with the barometer. The image should show why these two different measurements are not compatible - the aircraft can't fly both the orange line and the purple line at the same time.
Key Settings:
nav_max_terrain_follow_alt- Maximum altitude above ground in Surface mode (default 100cm)inav_max_surface_altitude- Maximum rangefinder range to use (default 200cm)
Set these values to your rangefinder's reliable range, not its maximum range.
For complete setup and configuration guide, see Optic Flow and Rangefinder.
TELEMETRY
Stay tuned for description
TURN ASSIST
Normally YAW stick makes a turn around a vertical axis of the craft - this is why when you fly forward in RATE and do a 180-deg turn using only YAW you'll end up looking upwards and flying backwards. In ANGLE mode this also causes an effect known as a pirouetting where turn is not smooth the horizon line is not maintained.
In RATE mode pilot compensated for this effect by using both ROLL and YAW sticks to coordinate the rotation and keep attitude (horizon line).
TURN ASSISTANT mode calculates this additional ROLL command required to maintain a coordinated YAW turn effectively making YAW stick turn the aircraft around vertical axis relative to the ground.
In RATE mode it allows one to makes a perfect yaw-stick only turn without changing attitude of the machine. There might be slight drift due to not instant response of PID control, but still much easier to pilot for a RATE-mode beginners.
In ANGLE mode it also makes yaw turns smoother and completely pirouette-less. This is because TURN ASSIST introduces feed-forward control in pitch/roll and maintains attitude naturally and without delay.
TAS (from airspeed sensor) will be used for calculation if available - otherwise code will use cruise airspeed defined by fw_reference_airspeed.
The CLI parameters relevant to this are:
TURTLE (MC)
Provides a means of flipping over a multicopter that has crash landed upside down, by using the roll or pitch sticks.
USER
These are shown as USER1 & USER2 & USER3 & USER4 and also known as PinIO, when broken out on many flight controllers.
The four USER selections are generic in nature, but are often used for certain functions depending on what the flight controller manufacturer decides to place on that mode.
Example
- Some FC manufactures have
USER 1as a VTX power switch, which includes the electronic hardware, to power ON and OFF your HD or Analogue VTX. - They may also add the flight controller hardware to allow for analogue dual camera switching on
USER 2. - While it is common to see
USER 3selected to turn ON or OFF the power to a free standing HD camera. - And
USER 4to allow for the remote Start/Stop recording of a free standing HD camera.
This should not be taken as a set order. Always read the hardware definition in FC manufacturers manual.
WP Planner
This is a Navigation-Mode that allows you to plot a waypoint mission as you fly. See more details
AUXILIARY CONFIGURATION
Spare auxiliary receiver channels can be used to enable/disable modes. Some modes can only be enabled this way.
Configure your transmitter so that switches or dials (potentiometers) send channel data on channels 5 and upwards (the first 4 channels are usually occupied by the throttle, aileron, rudder, and elevator channels).
e.g. You can configure a 3 position switch to send 1000 when the switch is low, 1500 when the switch is in the middle and 2000 when the switch is high.
Configure your TX/RX channel limits to use values between 1000 and 2000. The range used by mode ranges is fixed to 900 to 2100.
When a channel is within a specified range the corresponding mode is enabled.
Use the GUI configuration tool to allow easy configuration when channel.
CLI
There is a CLI command, aux that allows auxiliary configuration. It takes 5 arguments as follows:
- AUD range slot number (0 - 39)
- mode id (see mode list below)
- AUX channel index (AUX1 = 0, AUX2 = 1,... etc)
- low position, from 900 to 2100. Should be a multiple of 25.
- high position, from 900 to 2100. Should be a multiple of 25.
If the low and high position are the same then the values are ignored.
e.g.
Configure AUX range slot 0 to enable ARM when AUX1 is within 1700 and 2100.
aux 0 0 0 1700 2100
You can display the AUX configuration by using the aux command with no arguments.
Mode ID List
| Mode | ID |
|---|---|
| ARM | 0 |
| ANGLE | 1 |
| HORIZON | 2 |
| NAV ALTHOLD | 3 |
| HEADING HOLD | 5 |
| HEADFREE | 6 |
| HEADADJ | 7 |
| CAMSTAB | 8 |
| NAV RTH | 10 |
| NAV POSHOLD | 11 |
| MANUAL | 12 |
| BEEPER | 13 |
| LEDS OFF | 15 |
| LIGHTS | 16 |
| OSD OFF | 19 |
| TELEMETRY | 20 |
| AUTO TUNE | 21 |
| BLACKBOX | 26 |
| FAILSAFE | 27 |
| NAV WP | 28 |
| AIR MODE | 29 |
| HOME RESET | 30 |
| GCS NAV | 31 |
| FPV ANGLE MIX | 32 |
| SURFACE | 33 |
| FLAPERON | 34 |
| TURN ASSIST | 35 |
| NAV LAUNCH | 36 |
| SERVO AUTOTRIM | 37 |
| KILLSWITCH | 38 |
| CAMERA CONTROL 1 | 39 |
| CAMERA CONTROL 2 | 40 |
| CAMERA CONTROL 3 | 41 |
| OSD ALT 1 | 42 |
| OSD ALT 2 | 43 |
| OSD ALT 3 | 44 |
| NAV COURSE HOLD | 45 |
| MC BRAKING | 46 |
| USER1 | 47 |
| USER2 | 48 |
| LOITER CHANGE | 49 |
| MSP RC OVERRIDE | 50 |
| PREARM | 51 |
| TURTLE | 52 |
| NAV CRUISE | 53 |
| AUTO LEVEL | 54 |
| WP PLANNER | 55 |
| SOARING | 56 |
Advanced Topics
You can find explanations of stick commands, and other features in the Stick Controls